🦖 Arduino Chrome Dino Game - Build Your First Game Using Arduino ! 🎮
Welcome back to electronicmindset.com
If you want to make your first game using arduino, then this article is definitely what you are looking for!
In this project, you'll create a small game where your dinosaur jumps over obstacles on an I2C LCD screen using simple components.
It's fun, interactive, and perfect for beginners looking to combine coding , electronics and having some fun playing games.
So Let's get started !
Table of contents
- Materials You Will Need 🛠️
- Circuit Diagram 🔌
- Write the Arduino Code 💻
- Explanation of the code
- Upload the sketch
- Test & Play Your Game 🎮
- Improvements
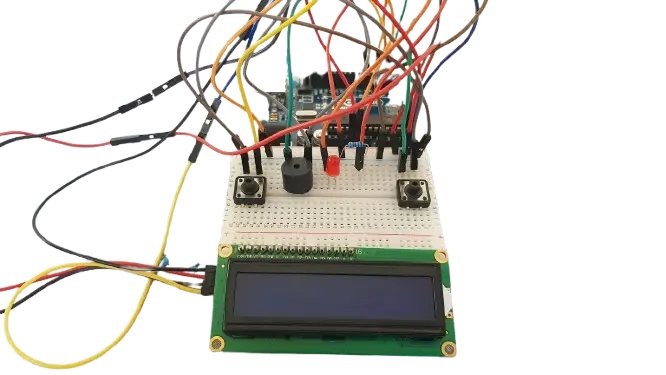
Prototype:
To make this project ,you have to follow these steps:
Step 1: Gather your materials.
You will need:
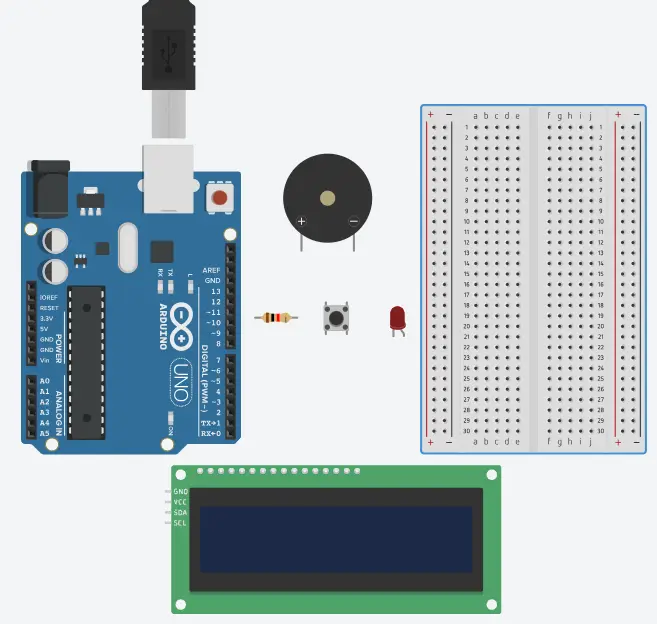
- Red Led (you can choose any color)
- 220 ohms resistors
- DC Buzzer
- PushButton
- LCD with I2C module
- breadboard
- Arduino Uno or any Arduino type
- Cable of arduino
- Jumper wires
- Laptop or computer
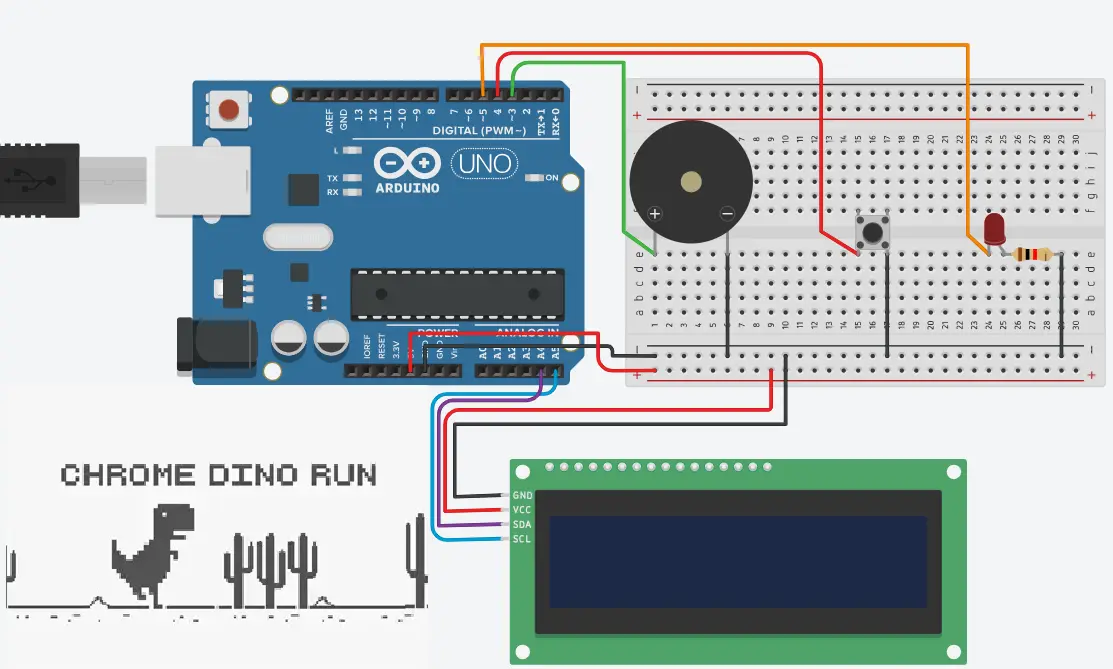
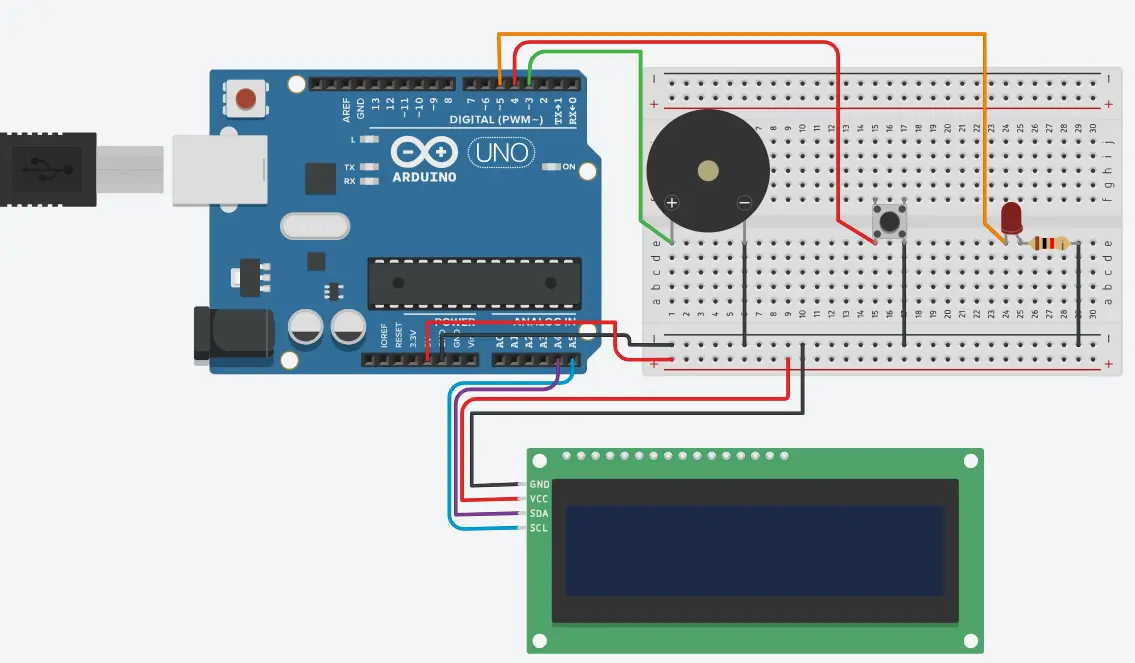
Step 2: Build the circuit.
Building your first game is quite straightforward !
First, for the lcd , connect VCC to 5V and GND pin to GND and connect SDA to A4 pin and SCL to A5 pin .
Then , connect the DC buzzer positive leg to digital pin 6 and its negative leg to GND.
You will be using a pushbutton to make the dino jump , make sure to connect the first leg to GND and the second one to Pin 4
For the Red LED, connect the cathode pin (the shorter lead ) through a 220 ohm resistor to GND and connect the anode to Pin 5.
All of this , is connected to the breadboard using jumper wires !
The schematics below will help you build the circuit just in case you don't understand:
Step 3: Write the code
Open the Arduino IDE on your computer, and write the following code:
// Source: https://electronicmindset.netlify.app/projects/arduino-chrome-dino-game.html
#include <Wire.h>
#include <LiquidCrystal_I2C.h>

LiquidCrystal_I2C lcd(0x27, 16, 2);

const int buttonPin = 4;
const int ledPin = 5;
const int buzzerPin = 3;

bool isJumping = false;
unsigned long jumpStartTime = 0;
const unsigned long jumpDuration = 1200; // jump lasts 1.2 seconds

int obstacleGroundPos = 15;   // cactus
int score = 0;

// -------- Dino bitmaps --------
byte dinoRightGround[8] = {
  0b00111,
  0b00111,
  0b00111,
  0b00100,
  0b11100,
  0b11100,
  0b11000,
  0b01000
};
byte dinoLeftGround[8] = {
  0b00000,
  0b00000,
  0b00010,
  0b00010,
  0b00011,
  0b00011,
  0b00001,
  0b00001
};
byte dinoRightJump[8] = {
  0b00111,
  0b00111,
  0b00111,
  0b00100,
  0b11100,
  0b11100,
  0b11000,
  0b01000
};
byte dinoLeftJump[8] = {
  0b00000,
  0b00000,
  0b00000,
  0b00000,
  0b11111,
  0b00011,
  0b00001,
  0b00001
};

// Ground obstacle (cactus)
byte obstacleChar[8] = {
  0b00101,
  0b10101,
  0b10101,
  0b10101,
  0b01101,
  0b00110,
  0b00100,
  0b00100
};

void setup() {
  pinMode(buttonPin, INPUT_PULLUP);
  pinMode(ledPin, OUTPUT);
  pinMode(buzzerPin, OUTPUT);

  lcd.init();
  lcd.backlight();

  lcd.createChar(0, dinoLeftGround);
  lcd.createChar(1, dinoRightGround);
  lcd.createChar(2, dinoLeftJump);
  lcd.createChar(3, dinoRightJump);
  lcd.createChar(4, obstacleChar);

  lcd.clear();
  lcd.setCursor(5, 0);
  lcd.print("Arduino");
  lcd.setCursor(4, 1);
  lcd.print("Dino Game!");
  delay(2000);
  lcd.clear();
}

void loop() {
  // Check button for jump
  if (digitalRead(buttonPin) == LOW && !isJumping) {
    isJumping = true;
    jumpStartTime = millis();  // start jump timer
    tone(buzzerPin, 1000, 100);
  }

  // Reset jump after duration
  if (isJumping && millis() - jumpStartTime >= jumpDuration) {
    isJumping = false;
  }

  lcd.clear();

  // Draw Dino
  lcd.setCursor(0, isJumping ? 0 : 1);
  if (isJumping) {
    lcd.write(byte(2));
    lcd.write(byte(3));
  } else {
    lcd.write(byte(0));
    lcd.write(byte(1));
  }

  // Draw cactus
  lcd.setCursor(obstacleGroundPos, 1);
  lcd.write(byte(4));

  // Display score
  lcd.setCursor(8, 0);
  lcd.print("Score:");
  lcd.print(score);

  // -------- Collision detection --------
  if ((obstacleGroundPos == 0 || obstacleGroundPos == 1) && !isJumping) {
    gameOver();
    return;
  }

  delay(200);

  // Move cactus
  obstacleGroundPos--;
  if (obstacleGroundPos < 0) {
    obstacleGroundPos = 15;
    score++;
  }
}

// -------- Game over function --------
void gameOver() {
  digitalWrite(ledPin, HIGH);
  tone(buzzerPin, 200, 1000);
  lcd.clear();
  lcd.setCursor(3, 0);
  lcd.print("GAME OVER!");
  lcd.setCursor(4, 1);
  lcd.print("Score:");
  lcd.print(score);
  delay(2000);

  // Reset game
  digitalWrite(ledPin, LOW);
  obstacleGroundPos = 15;
  score = 0;
  isJumping = false;
  lcd.clear();
}
📝 Code Explanation:
1. Dino Character Bitmaps
byte dinoRightGround[8] = {
  0b00111,
  0b00111,
  0b00111,
  0b00100,
  0b11100,
  0b11100,
  0b11000,
  0b01000
};

byte dinoLeftGround[8] = {
  0b00000,
  0b00000,
  0b00010,
  0b00010,
  0b00011,
  0b00011,
  0b00001,
  0b00001
};
This defines the shape of the dinosaur on the LCD. Left and right bitmaps make the dino look bigger and more detailed. You can design your own using the tool we have below :
🦖 LCD Bitmap Designer
If you don't like the default Dino or Cactus designs, use the tool below to create any shape you want — get creative!
Click the cells to draw your Dino (Left/Right) and Cactus. Use the “Clear” buttons to reset a grid. When you're happy with your design, click “Generate Arduino Code” to get the byte arrays, then replace them in your original code.
Dino Left
Dino Right
Cactus
Generated Arduino Code:
lcd.createChar(0, dinoLeftGround);
lcd.createChar(1, dinoRightGround);
lcd.write(0); // Displays left side
lcd.write(1); // Displays right side
createChar registers your bitmap on the LCD. lcd.write displays it.
2. Dino Jump Logic
if (digitalRead(buttonPin) == LOW && !isJumping) {
  isJumping = true;
  jumpStartTime = millis();
  tone(buzzerPin, 1000, 100);
}

if (isJumping && millis() - jumpStartTime >= jumpDuration) {
  isJumping = false;
}
Press the jump button to make the dino jump for 1.2 seconds. The buzzer plays a short sound to make it fun!
3. Cactus (Obstacle)
byte obstacleChar[8] = {
  0b00101,
  0b10101,
  0b10101,
  0b10101,
  0b01101,
  0b00110,
  0b00100,
  0b00100
};

lcd.setCursor(obstacleGroundPos, 1);
lcd.write(byte(4));
This is the cactus moving from right to left on the ground row. Avoid it to keep scoring!
4. Moving the Cactus & Scoring
obstacleGroundPos--;
if (obstacleGroundPos < 0) {
  obstacleGroundPos = 15;
  score++;
}
The cactus moves left each loop. When it leaves the screen, it resets to the right and your score increases.
5. Collision Detection
if ((obstacleGroundPos == 0 || obstacleGroundPos == 1) && !isJumping) {
  gameOver();
  return;
}
If the cactus reaches the dino while it's on the ground, the game ends and triggers gameOver().
6. Game Over & Reset
digitalWrite(ledPin, HIGH);
tone(buzzerPin, 200, 1000);
lcd.clear();
lcd.setCursor(3, 0);
lcd.print("GAME OVER!");
lcd.setCursor(4, 1);
lcd.print("Score:");
lcd.print(score);

obstacleGroundPos = 15;
score = 0;
isJumping = false;
lcd.clear();
LED lights up and buzzer plays. Displays GAME OVER and your score. Then resets the game for a new round. 🎮
Step 4: upload the sketch
Once your circuit is ready and your code is complete, it's time to upload the sketch to your Arduino board. Follow these simple steps:
First, open the Arduino IDE on your computer and copy your Dino Game code into a new sketch. Click the checkmark (✓) icon to verify that there are no errors.
Then, go to Tools → Board to select your Arduino type (Uno, Nano, etc.) and Tools → Port to choose the correct port where your Arduino is connected.
Finally, click the right arrow (→) icon to upload the code. The LCD will light up, and your game will start automatically.
🔋 Use Of Battery
You can power the Arduino via USB or a 9V battery connected to Vin and GND for a portable game. Once uploaded, your dino is ready to jump over a cactus and you can start playing! 🦖🌵
How To Play Your Game !
🕹️ After uploading the sketch, it's time to test your Dino Game! Make sure your Arduino is powered on and all the connections are correct.
Watch the LCD screen light up and see your dino appear. Press the jump button to make the dino jump over the cactus obstacles.
Every time the dino successfully avoids a cactus, your score increases. If the dino hits a cactus, the LED lights up, a buzzer sounds, and the LCD shows “GAME OVER” along with your final score.
The game then resets automatically, letting you play round after round and try to beat your previous score. Have fun jumping and keep improving! 🦖🌵🎮
Well Congratulations 🎉 You've just built your first game using arduino to test your reflexes and compete with your friends !
🛠️ Arduino Dino Game - Improvements
In this section, we are going to upgrade our circuit while keeping the same components but only modifying the code !
Here's the updated version of our Arduino Dino Game with smooth jump, high score saved in EEPROM, and better display handling.
This improved Arduino Dino Game features a smoother jump with both halves of the dinosaur visible, a high score saved in EEPROM that remembers your best even after restarting, and randomly placed cactus obstacles for more fun.
The dinosaur stays in the air longer, making jumps easier to time and the game more enjoyable.