How To Make A Radar Using Arduino Uno ?
Welcome back to electronicmindset.com
In this article, we are going to create an Arduino Ultrasonic Radar that detects obstacles and alerts you with a buzzer and LED. This is a simple arduino project with Arduino !
Table of contents
- Explanation of the circuit !
- 1. Gather Your Supplies
- 2. Construct the Circuit
- 3. Write the code
- 4. Upload the sketch
- 5. Test the circuit
What does the circuit do exactly ?
So basically ,the radar works like this:
First,a servo motor rotates an ultrasonic sensor back and forth, scanning the environment, keep in mind a green Led is ON showing safe zone.
When the sensor detects an object within a certain distance, the servo stops rotating. At the same time, a buzzer sounds and an RED LED lights up to alert you about the obstacle.
Once the object is removed, the radar resumes scanning automatically.
To make this project ,you have to follow these steps:
Step 1: Gather your materials.
You will need:
- A Red LED (to alert the user.)
- A Green LED (to indicate safe zone.)
- 2 of 220 ohms resistors
- breadboard
- Ultrasonic Sensor (HC-SR04 or similar)(for scanning)
- DC buzzer (to alert the user)
- Arduino Uno
- Cable of arduino
- Servo Motor (to rotate the ultrasonic sensor for scanning .)
- Hot Glue
- Jumper wires
- Laptop or computer
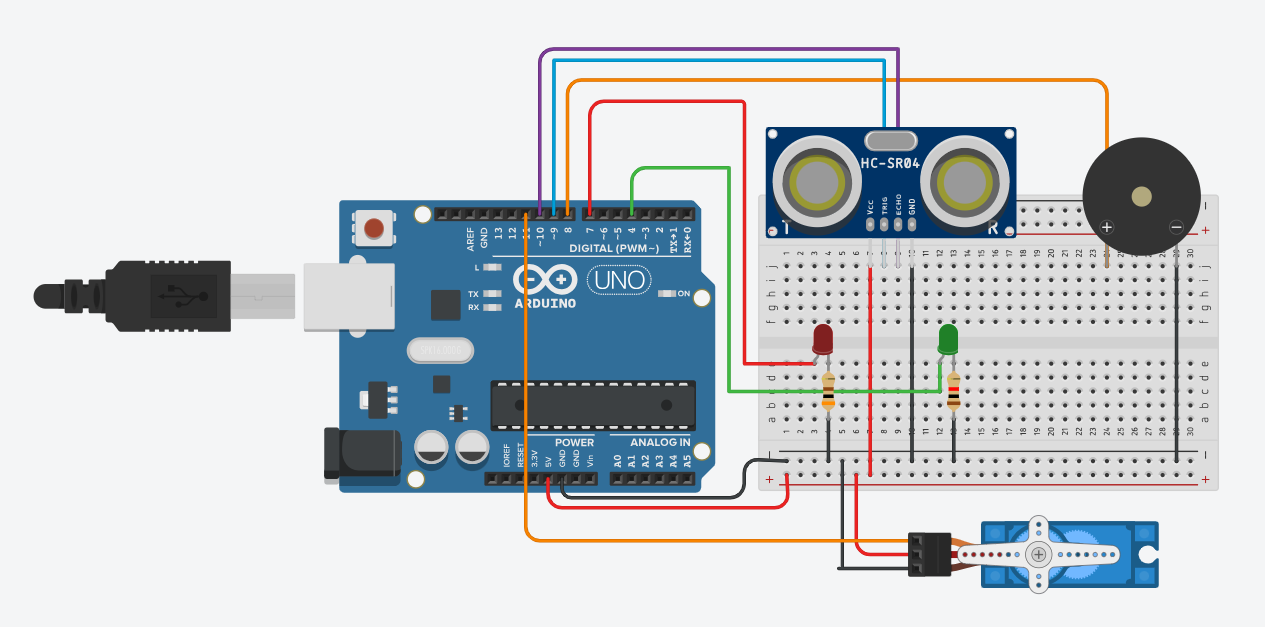
Step 2: Build the circuit.
First, place the 2 LED's a red one and a green one on the breadboard. For the red led Connect the longer lead (anode) to pin 7 on the Arduino UNO. Then, connect the shorter lead (cathode) to a 220Ω resistor, and connect the other end of the resistor to GND on the Arduino. This LED will light up whenever the radar detects an obstacle.
For The green Led For the red led Connect the longer lead (anode) to pin 6 on the Arduino UNO. Then, connect the shorter lead (cathode) to a 220Ω resistor, and connect the other end of the resistor to GND on the Arduino. This LED will light up whenever the radar doesn't detect an obstacle.
Next, place the buzzer on the breadboard. Connect the positive lead of the buzzer to pin 8 on the Arduino, and the negative lead to GND. The buzzer will sound when an object is detected by the ultrasonic sensor.
Now, take the ultrasonic sensor (HC-SR04) and connect its VCC pin to the 5V on the Arduino and its GND pin to GND. Connect the TRIG pin of the sensor to pin 9 on the Arduino, and the ECHO pin to pin 10. This sensor will measure the distance to nearby objects.
Finally, place the servo motor on the breadboard (or secure it separately). Connect its signal wire to pin 11 on the Arduino, VCC to 5V, and GND to GND. The servo will rotate the ultrasonic sensor back and forth, scanning for obstacles.
Once all components are connected, the Arduino will rotate the servo continuously. When the ultrasonic sensor detects an object within the set distance, the servo stops, the RED LED lights up, and the buzzer sounds, creating a mini radar effect.
Shematics
Step 3: Write the code
Open the Arduino IDE on your computer, and write the following code:
// Source: https://electronicmindset.netlify.app/projects/how-to-make-a-radar-using-arduino
#include <Servo.h>

// --- Pins ---
#define echoPin   10
#define trigPin   9
#define servoPin   11
#define redLED     7
#define greenLED   4
#define buzzerPin  8

Servo myServo;
const int maxDistance = 20;   // detection threshold in cm
const int stepDelayMs = 15;   // servo speed

// --- Function to measure distance ---
int getDistance() {
  digitalWrite(trigPin, LOW);
  delayMicroseconds(2);
  digitalWrite(trigPin, HIGH);
  delayMicroseconds(10);
  digitalWrite(trigPin, LOW);

  long duration = pulseIn(echoPin, HIGH, 25000UL); // timeout ~4m
  if (duration == 0) return 9999; // no reading
  return duration * 0.034 / 2;
}

void setup() {
  pinMode(trigPin, OUTPUT);
  pinMode(echoPin, INPUT);
  pinMode(redLED, OUTPUT);
  pinMode(greenLED, OUTPUT);
  pinMode(buzzerPin, OUTPUT);

  myServo.attach(servoPin);
  Serial.begin(9600);
}

void loop() {
  // Sweep 0 -> 180
  for (int angle = 0; angle <= 180; angle++) {
    myServo.write(angle);
    delay(stepDelayMs);

    int d = getDistance();
    Serial.print("Angle "); Serial.print(angle);
    Serial.print(" | distance "); Serial.println(d);

    if (d <= maxDistance) {
      // Alert ON
      digitalWrite(redLED, HIGH);
      digitalWrite(buzzerPin, HIGH);
      digitalWrite(greenLED, LOW);

      // Stay here until object moves away
      while (getDistance() <= maxDistance) {
        delay(50);
      }

      // Alert OFF, continue scanning immediately
      digitalWrite(redLED, LOW);
      digitalWrite(buzzerPin, LOW);
      digitalWrite(greenLED, HIGH);
    } else {
      // Safe
      digitalWrite(greenLED, HIGH);
      digitalWrite(redLED, LOW);
      digitalWrite(buzzerPin, LOW);
    }
  }

  // Sweep 180 -> 0
  for (int angle = 180; angle >= 0; angle--) {
    myServo.write(angle);
    delay(stepDelayMs);

    int d = getDistance();
    Serial.print("Angle "); Serial.print(angle);
    Serial.print(" | distance "); Serial.println(d);

    if (d <= maxDistance) {
      // Alert ON
      digitalWrite(redLED, HIGH);
      digitalWrite(buzzerPin, HIGH);
      digitalWrite(greenLED, LOW);

      // Stay here until object moves away
      while (getDistance() <= maxDistance) {
        delay(50);
      }

      // Alert OFF, continue scanning immediately
      digitalWrite(redLED, LOW);
      digitalWrite(buzzerPin, LOW);
      digitalWrite(greenLED, HIGH);
    } else {
      // Safe
      digitalWrite(greenLED, HIGH);
      digitalWrite(redLED, LOW);
      digitalWrite(buzzerPin, LOW);
    }
  }
}
Step 4: upload the sketch
First ,copy the code and paste it, then click on the checkmark icon (✓) on the top left corner of the IDE to verify that your code compiles without any errors.
Go to the "Tools" menu and select the appropriate board type ( Arduino Uno, Nano, etc...)
Then go to "Ports"submenu and select the port to which your Arduino board is connected. On Windows, it appears as COMx, and on macOS, it appears as /dev/cu.usbmodemxxxx.
Once the correct board and port are selected, click on the right arrow icon (→) next to the checkmark to upload the sketch to the Arduino board.
Use of a battery
The circuit that you have made is powered by your computer via the USB port.
If you want to power your arduino with 9V battery, make sure the positive terminal is connected to "VIn" pin in arduino and the negative terminal connected to "Gnd" pin .
Step 5: Test the Circuit
Once the sketch is uploaded, power your Arduino Uno. The servo motor should start rotating, scanning the area like a radar. The green LED will turn on when no obstacle is detected, meaning the area is safe.
When an object enters the ultrasonic sensor's detection range, the servo will stop rotating and the red LED will turn on to indicate detection. Once the object is removed, the servo continues rotating and the green LED lights up again.
You can adjust the detection range in the Arduino sketch by changing the distance threshold value. This allows you to set how close an object must be before the radar stops and the red LED is activated.
That's it! You've successfully built and tested your Arduino radar system using an ultrasonic sensor, LEDs, and a servo motor.
